Why Use Dante?
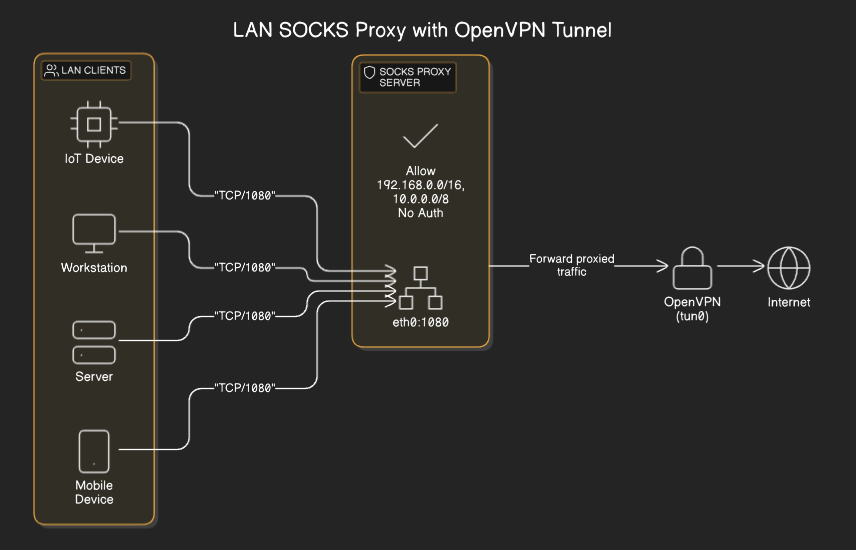
Sometimes I only want to proxy traffic from specific applications on my devices, not an entire device. For example, I might route Firefox through a VPN to watch Korean dramas or The Great British Bake Off on the BBC, while keeping the rest of my desktop — like an online game — off the VPN to avoid extra latency. Additionally, some VPN providers limit you to a single tunnel per subscription. By setting up a Dante SOCKS5 proxy, you can create a single VPN tunnel and configure select applications — even across multiple devices — to use it, giving you greater network flexibility. Using the diagram below as a reference, what we’re hoping to build is something that will:
- Send traffic to the LAN interface of the Dante Server.
- Proxy the traffic using Dante and sending it over the VPN interface.
- Letting your traffic exit wherever your VPN provider egresses.

Prerequisites
- Root access to an Ubuntu 24.04 instance (for example, I’m using an Ubuntu 24.04 LXC container on Proxmox 8.4).
- An active VPN that creates a persistent virtual tunnel interface on your Ubuntu LXC container that survives reboots. (For this example, I’m using a Droplet on DigitalOcean running OpenVPN)
- The internal and external network/VPN interfaces might have different names than the ones in the example. It’d be good to notate your LAN and VPN interfaces prior to configuration with the following command:
ip a
Installing and Configuring Dante
Run the following command to update and upgrade your apt packages, as well as install the Dante SOCKS5 Server.
sudo apt update && sudo apt upgrade -y && sudo apt install dante-server -y
After the application installs, Dante will likely be broken and stopped. Lets clear the existing config and start over with the following commands. (If you already have a Dante server running, these commands will wipe out your config, make sure you have backups)
sudo rm /etc/danted.conf
sudo nano /etc/danted.conf
Using Nano, you can start with this base configuration. It does not require authentication and allows connections from most RFC1918 addresses. Make sure to place it in a segmented DMZ, on a trusted LAN, or take additional steps to create users and update the authentication settings.
Remember in Prerequisite #3, your interfaces might have different names.
logoutput: syslog
user.privileged: root
user.unprivileged: nobody

# Listen on local LAN interface and port tcp/1080, your LAN interface might have a different label
internal: eth0 port=1080

# Send proxied traffic over VPN or tunnel, your VPN interface might not be named tun0, if it's wireguard it probably starts with wg like wg0
external: tun0

# No authentication required for SOCKS clients
socksmethod: none

# No authentication required for initial client connection
clientmethod: none

# Allow clients from 192.168.0.0/16 and 10.0.0.0/8
client pass {
    from: 192.168.0.0/16 to: 0.0.0.0/0
    log: connect disconnect error
}

client pass {
    from: 10.0.0.0/8 to: 0.0.0.0/0
    log: connect disconnect error
}

# Allow proxying from these networks to anywhere, without authentication
socks pass {
    from: 192.168.0.0/16 to: 0.0.0.0/0
    log: connect disconnect error
}

socks pass {
    from: 10.0.0.0/8 to: 0.0.0.0/0
    log: connect disconnect error
}
After you save the danted.conf file, you’ll want to enable, restart and check the status of the danted.service. This will make it start on reboot, start in your current runtime, and check the status:
sudo systemctl enable danted.service
sudo systemctl restart danted.service
sudo systemctl status danted.service
If your status looks good, we can setup a client to use the Dante SOCKS5 Proxy Service.
Configuring a Client Application.
Let’s use Firefox to test. Lets navigate to the Firefox Network Settings by going to:
Settings -> Scroll all the way down -> Network Settings
Here is a picture of my demo SOCKS5 Firefox settings:
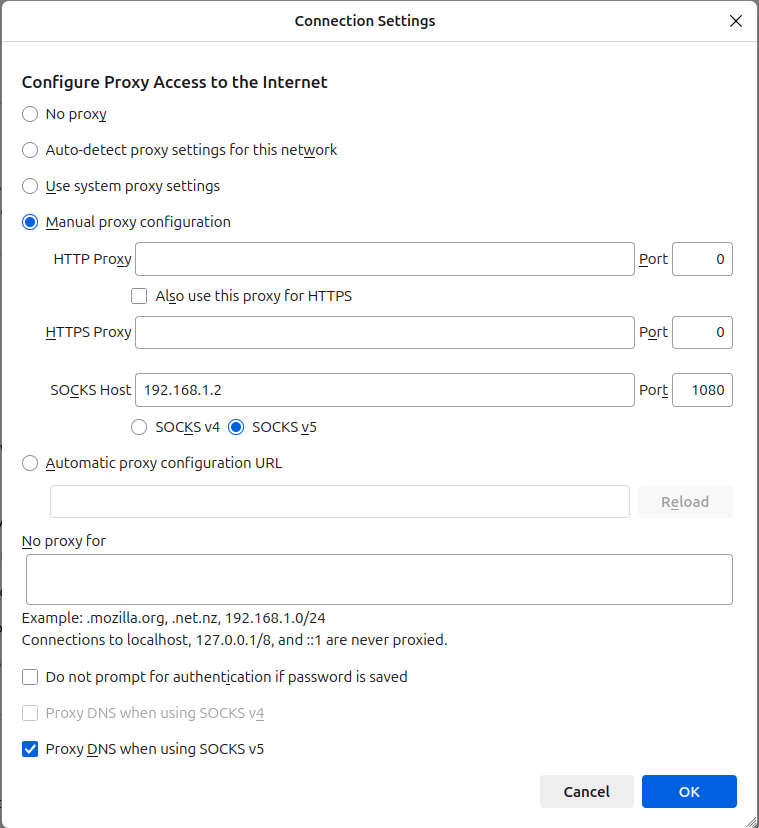
You can also use curl as seen below:
curl -x socks5://192.168.1.2:1080 https://api.ipify.org?format=json
Success is when the return from that curl query matches the public IP Address of the VPN Server. If we’re going off of the diagram, the return would look like:
{"ip":"72.72.72.73"}
That’s pretty much all there is to it. I hope this helped you out!